Section 3: Lane Geometry and Arrow Orientation
Introduction
This section covers guide sign arrow orientation based on
route direction and various freeway lane geometries. The guidance
in this section is primarily for freeway-to-freeway interchanges,
which are discussed in the next section; however, the guidance may
be used for other types of interchanges if additional lane assignment
is necessary.
Route Arrangement and Lane Geometry
Figure 5‑8 illustrates the three basic types of route arrangements that can exist at a freeway-to-freeway interchange. These include:
- The freeway continues to the left and traffic exits to the right to a different freeway. This arrangement is most consistent with driver expectancy.
- The freeway continues to the right and traffic exits to the left to a different freeway. This is a left exit condition.
- The freeway ends at another freeway. Traffic exits the ending freeway to travel in either direction on the other freeway.
For each route arrangement, three types of lane geometries are possible. These include:
- The left branch is on a tangent alignment, and the right branch is curved.
- Both the left and right branches are on a curved alignment.
- The right branch is on a tangent alignment, and the left branch is curved.
Figure 5‑8 illustrates nine combinations of route arrangements that are possible when an optional lane serves both the continuing and exiting routes. Similar combinations are possible when no optional lane is present.
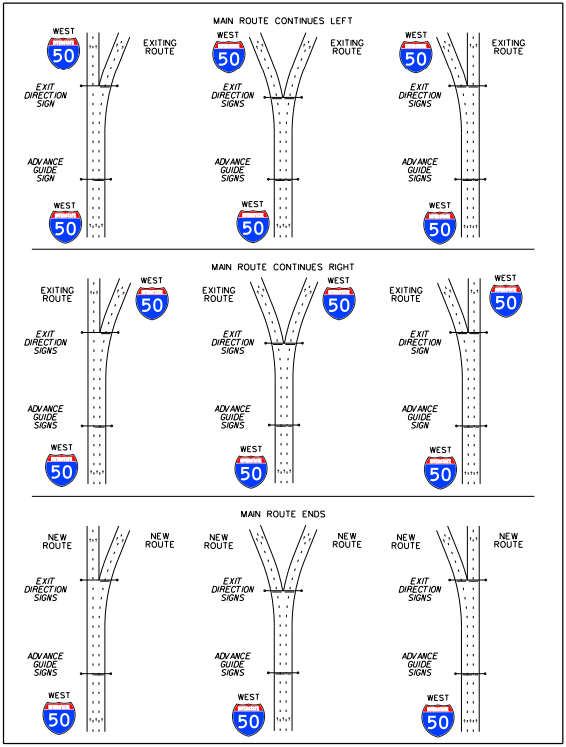
Figure 5-8. Route direction and lane geometry at an interchange.
Arrow Orientation
When lane assignment is desired, all exiting lanes at that
location should be marked with down arrows and/or upward slanting
arrows on overhead Advance Guide and Exit Direction signs.
Advance Guide signs, either with or without Exit Only panels,
are located upstream of the gore and should have only one downward
arrow per travel lane. In some cases, two destinations can be reached
from one lane (an optional lane), and only one downward arrow should
be placed for that lane on the Advance Guide signs. This arrow should
be placed on the through Interstate Highway route. If the route
ends at the split, or if both destinations are non-Interstate Highway
routes, the downward arrow on the Advance Guide signs for the optional
lane should be placed for the destination with the higher traffic
volume or the route that favors a through movement.
Exit Direction signs, either with or without Exit Only panels,
are located at the gore location and may have downward and/or upward
slanting arrows depending on the lane geometry of the freeway lanes.
The following general rules apply to the use of arrows on Exit Direction
signs for freeway-to-freeway interchanges:
- If a Pull-Through sign is used at the gore for the continuing route, the type of arrow is determined as follows:If the continuing route is…Then…on a tangent alignment in the vicinity of the goredown arrows are used.not on tangent alignment in the vicinity of the goreupward slanting arrows are used.
- Upward slanting arrows are used for the exiting route.
- Upward slanting arrows are used for both directions when a route ends at another freeway.
The number of arrows on the sign structure must be equal to
the number of lanes underneath the sign structure, unless there
is an optional lane. When there is an optional lane, the number
of arrows on the sign structure may be the same as the number of
lanes immediately downstream of the structure, if the structure
is located within the lane-increase transition.
Pull-Through Signs
Although shown in the illustrations in this section, Pull-Through
signs may not be necessary at all freeway-to-freeway interchanges.
Arrow Placement for Route Continuing to the Left
The following table illustrates Advance Guide and Exit Direction sign arrow orientation when the freeway route continues to the left. The examples are based on three approach lanes, but additional lanes may be present on the right or left sides.
Lane Geometry | Sign Type | Left Route Signing | Right Route Signing |
|---|---|---|---|
 | Exit Direction Sign | Sign and/or Arrows Not Necessary 1 |  |
Advance Guide Signs | Sign and/or Arrows Not Necessary 1 |  | |
 | Exit Direction Sign |  |  |
Advance Guide Signs |  |  | |
 | Exit Direction Sign |  |  |
Advance Guide Signs |  |  | |
 | Exit Direction Sign | Sign and/or Arrows Not Necessary 1 |  |
Advance Guide Signs | Sign and/or Arrows Not Necessary 1 |  | |
 | Exit Direction Sign |  |  |
Advance Guide Signs 2 |  |  | |
 | Exit Direction Sign |  |  |
Advance Guide Signs 2 |  |  | |
1 Typical right-lane exit where arrows are not necessary for the through route. | |||
2 Two arrows on the Advance Guide signs favor the through Interstate Highway. If the route ends at the split, or if both destinations are non-Interstate Highway routes, the downward arrow on the Advance Guide signs for the optional lane should be placed for the destination with heaviest traffic volume movement (see Figure 5‑8). | |||
Arrow Placement for Route Continuing to the Right
The following table illustrates Advance Guide and Exit Direction sign arrow orientation when the freeway route continues to the right. The examples are based on three approach lanes, but additional lanes may be present on the right or left sides.
Lane Geometry | Sign Type | Left Route Signing | Right Route Signing |
|---|---|---|---|
| Exit Direction Sign |  |  |
Advance Guide Signs |  |  | |
| Exit Direction Sign |  | |
Advance Guide Signs |  | | |
| Exit Direction Sign |  | Sign and/or Arrows Not Necessary |
Advance Guide Signs |  | Sign and/or Arrows Not Necessary 1 | |
| Exit Direction Sign |  |  |
Advance Guide Signs 2 |  |  | |
| Exit Direction Sign |  |  |
Advance Guide Signs 2 |  |  | |
| Exit Direction Sign |  | Sign and/or Arrows Not Necessary 1 |
Advance Guide Signs |  | Sign and/or Arrows Not Necessary 1 | |
1 Typical left-lane exit where arrows are not necessary for the through route. | |||
2 Two arrows on the Advance Guide signs favor the through Interstate Highway. If the route ends at the split, or if both destinations are non-Interstate Highway routes, the downward arrow on the Advance Guide signs for the optional lane should be placed for the destination with heaviest traffic volume movement (see Figure 5‑8). | |||
Arrow Placement for Route Ending
The following table illustrates Advance Guide and Exit Direction sign arrow orientation for when the freeway route ends and exits to another freeway. The examples are based on three approach lanes, but additional lanes may be present on the right or left sides.
Lane Geometry | Sign Type | Left Route Signing | Right Route Signing |
|---|---|---|---|
| Exit Direction Sign | | |
Advance Guide Signs | | | |
| Exit Direction Sign | | |
Advance Guide Signs | | | |
| Exit Direction Sign | | |
Advance Guide Signs | | | |
| Exit Direction Sign | | |
Advance Guide Signs1 | | | |
| Exit Direction Sign | | |
Advance Guide Signs 1 | | | |
| Exit Direction Sign | | |
Advance Guide Signs 1 | | | |
1 Two arrows on the Advance Guide signs favor the through Interstate Highway. If the route ends at the split, or if both destinations are non-Interstate Highway routes, the downward arrow on the Advance Guide signs for the optional lane should be placed for the destination with heaviest traffic volume movement (see Figure 5‑8). | |||