Repair Procedure
- Surface preparation.
- Remove any damaged or loose concrete.
- Avoid damage to sound concrete that is to remain in place.
- Unless otherwise approved by the Engineer, use only hand tools or power-driven chipping hammers (15-lb. class maximum) to remove concrete.
- If more than 1/2 the perimeter of any mild reinforcement is exposed or if the exposed bar exhibits significant corrosion, remove the concrete from around the entire bar.
- Provide ¾-inch clearance or 1.5 times the largest sized aggregate in the repair material, whichever is greater, between the steel and surrounding concrete to permit adequate flow of the repair material.NOTE: A good rule of thumb is that adequate clearance is attained when you are able to wrap your fingers around the bar. Ensuring that you can grab the bar is a simple but highly effective method of ensuring there is adequate clearance to permit the repair material to flow around the exposed bar.
- Do not chip around prestressing strand that is exposed anywhere away from the immediate end of the member. Consult the Engineer whenrepairingan area in which prestressing strands have been exposed. When repair dictates that chipping occur around exposed strands, the Contractor must avoid striking the strands directly or otherwise causing damage that could lead to wire or strand breaks.
- Use abrasive blasting to remove rust from exposed steel surfaces.
- Saw-cut therepairperimeters to eliminate feathered edges and to ensure that the repair material will be applied in depths no less than 1/2 inch.
- Handheld grinders or saws may be used to square therepairperimeters.
- Do not over-cut therepairperimeters at the corners of the repair areas.
- When practical, undercut therepairperimeter at an approximate angle of 30 degrees such that the profile will help hold therepairmaterial in place.
- Roughen the substrate to ensure that there will be a mechanical bond between therepairmaterial and the parent concrete. Though difficult to quantify and measure, Contractor should attempt to attain a minimum surface roughness profile of 1/8 inch or CSP (Concrete Surface Profile) 6 per ICRI.
- If the damage occurs at the end of a member and prestressing strand is exposed, recess the strands a minimum 3/8 inch using a torch or other approved method. Do not overheat or damage the surrounding concrete.
 Figure 3-1. Typical Repair Details
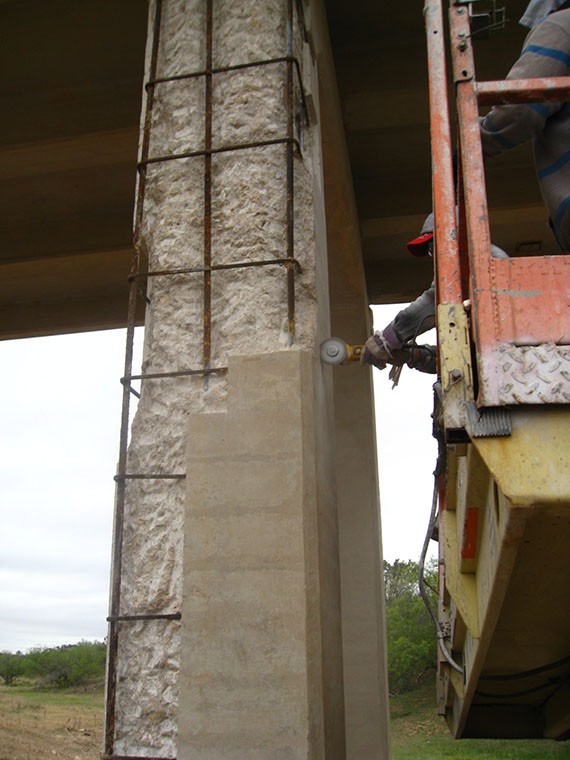 Figure 3-2. Preparation (saw-cutting) straight and squared edges to containrepairmaterial.
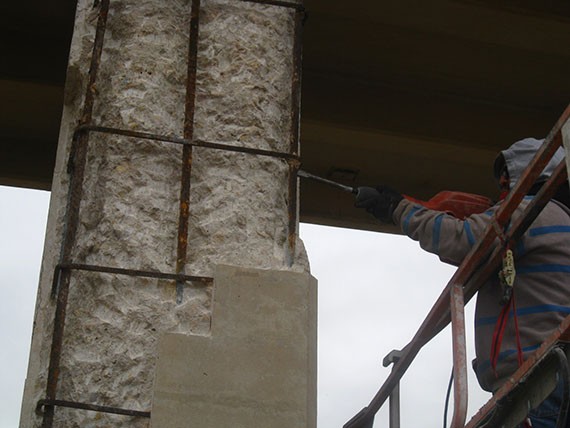 Figure 3-3. Chipping hammer used to remove unsound concrete.
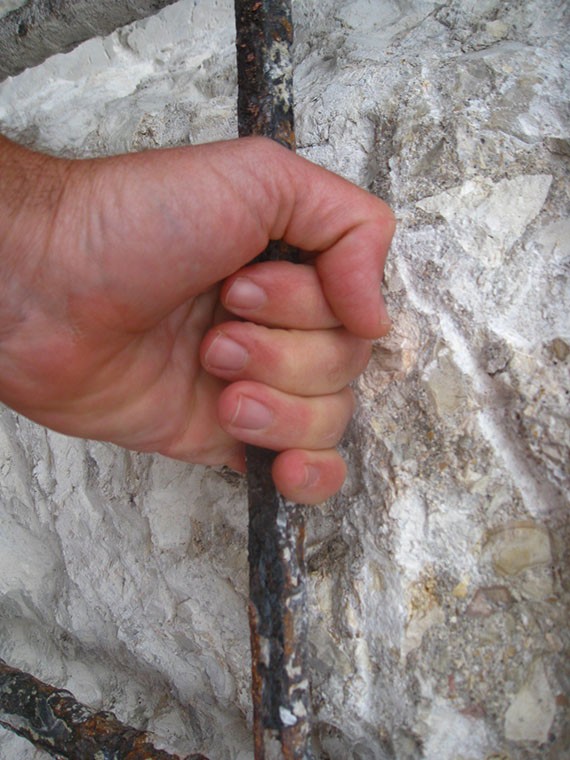 Figure 3-4. Verifying adequate clearance around reinforcing.
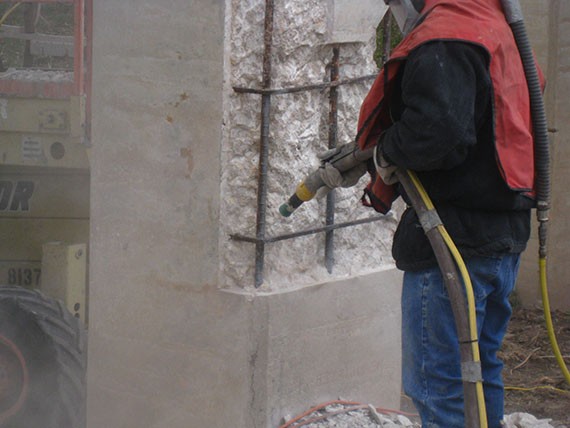 Figure 3-5. Abrasive blasting to clean reinforcing of rust/active corrosion.
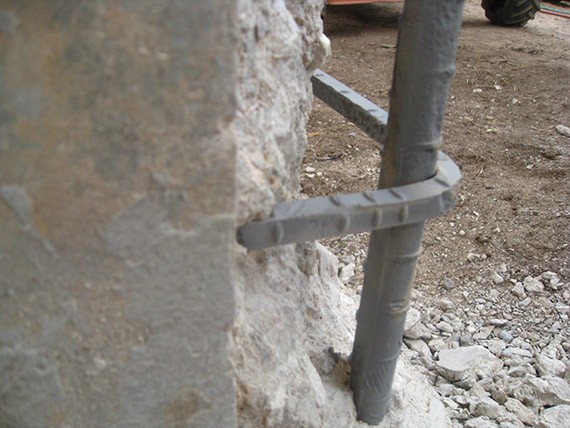 Figure 3-6. Reinforcing cleaned and free of rust.
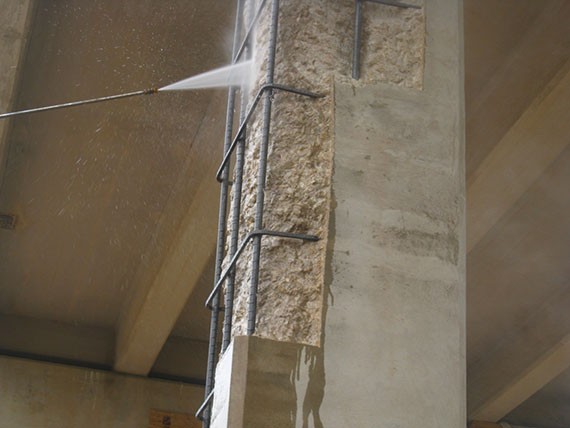 Figure 3-7. Pressurized water to clean and prepare surface (saturated surface dry).
 - NOTE: In the past some Contractors and Fabricators opted not to recess prestressing strands in spalled areas so the protruding sections could serve as dowels for therepairmaterial. While the strands would serve well as dowels in those circumstances, they could be exposed to moisture and chlorides if therepairfails over the life of the structure. For that reason it is more important that the strand be completely recessed. Install anchors to hold therepairmaterial in place.
- Mechanical ties that bind repair material to the substrate can greatly decrease the risk of future delamination and spalling. For most intermediate repairs, exposed steel serves that purpose. However, there are scenarios in which no reinforcement is exposed and thickness of the spall dictates that cementitiousrepairmaterial be utilized. In such cases it is necessary to install anchors to help mechanically tie the repair material to the parent concrete. When no mild reinforcement is exposed, install anchors at no more than6 incheson center each way or as required by the Engineer.Refer to Standard Specification Item 449 -. The anchors must consist of one of the followinganchor boltsand Figure 3-8 shows detail for concrete repair with mechanical anchors:
- Stainless steel expansion anchors. The Contractor may propose to use other anchors, such as galvanized or zinc-painted metal. The Engineer will review on a case-by-case basis.
- Rebar or threaded stainless steel pins (1/2-inch diameter minimum) anchored in place using TxDOT Type III anchoring adhesive. Remove any epoxy that leaks onto the patch substrate after the anchor is placed.
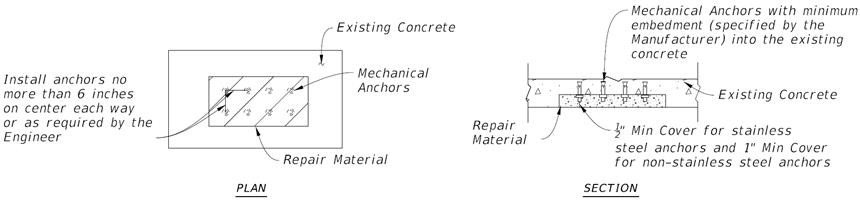 Figure 3-8.Concrete repair with mechanical anchors
 - If installing expansion anchors:
- Drill and clean the holes as required by the anchor manufacturer. Do not use a drill bit that has a larger diameter than that required.
- Embed the anchor the minimum amount required by the manufacturer. However, the anchor should not be driven further than necessary. In order to function as intended the head of the anchor must protrude into the repair material.
- If installing dowels using anchoring adhesive:
- Drill a hole 1/8 to 1/4 inch greater than the dowel diameter. Make the hole deep enough to permit a minimum 4-inch embedment of the dowel.
- Remove any contaminants from the hole using a brush or other mechanical cleaner.
- Just prior to installing the anchor, clean the hole using a high-pressure air compressor equipped with filters to remove all oil from the compressed air.
- Dry the concrete surface inside the hole prior to installing the dowel.
- Fill the hole approximately 1/3 full with the adhesive. Twist the dowel as it is inserted. Ensure that the space between the dowel and the concrete is completely filled with the adhesive. Remove all adhesive from the concrete surface that leaks from the hole after the dowel is inserted.NOTE: When using anchoring adhesives it is critical to properly drill and clean the anchor holes and to place a proper amount of material to keep the anchors in place. The drilled holes must be thoroughly cleaned which should include the use of clean high pressure air and mechanical brushing. Also, if there is too little adhesive, the anchor will not have enough pullout resistance. If there is too much adhesive, the material can leak out of the anchor hole and create a bond breaker on therepairsubstrate. It is imperative that the Contractor follow the manufacturer’s instructions and the above guidelines.
- Where anchors are installed, ensure that there will be a minimum cover of 1/2 inch for stainless steel and 1 inch for non-stainless steel after therepairmaterial is applied. Oftentimes anchors or dowels do not protrude far enough from the concrete substrate, leaving large depths ofrepairmaterial unanchored to the parent concrete. Contractor should install anchors with the exposed edge of therepairin mind, not the outside surface of the parent material.
- Substrates must be clean and sound. Remove any contaminants, including laitance, oil, dust, debris, or other foreign particles.
- Just prior torepairing, blast the repair area using a high-pressure air compressor equipped with filters to remove all oil from the compressed air.
- Mixing.For small applications (less than 1 cubic yard total) usegraduatedmeasuring cups or containers to determine the proper quantity of each component per the manufacturer’s requirements, then dispense into a clean container.Thoroughly mix the components by mechanical means (electric drill or mortar mixer) per the manufacturer's requirements.Do not mix repair mortar or concrete by hand.
- Do not estimate the proper amounts while adding the different components.
- For vertical and overhead applications Contractors often need to limit the amount of water or liquid component in order to achieve a stiff mix. Consult the manufacturer’s literature for minimum requirements.
- If extending the mortar to produce concrete, add aggregate and mix in accordance with the manufacturer’s requirements.
When mixing more than 1 cubic yard use a mortar mixer, volumetric mixer, or other method approved by the engineer. Contractor must submit detailed procedures on equipment type, proportioning methods, minimum mixing time, and placement.Many cementitious repair materials have relatively short working times (15 to 30 minutes).- Do not mix materials until the surface preparation is complete and the substrate is ready for application of the repair material.
- Mix only the amount of material necessary for immediate application.
- Review water requirements and temperatures. If the dry materials are left out in the environment, they can easily reach 90°F or higher. In cases where dry materials have elevated temperature, use cooled mix water to ensure workability. When performing repairs between the months of April and September, having ice to add to the mix water or using chilled water should be normal. It is much easier to use cooler repair material. Note that all the material set time and workability time shown on the material's product datasheet is based on a laboratory room temperature of 70°F.
- Do not attempt to make the material workable by over-mixing or adding additional liquid after it has begun to set. Over-mixing material that has begun to set can reduce the compressive strength and increase the permeability of the material. Exceeding maximum water content is bad for long term performance ofrepairmaterial.
- The beneficial properties of bagged mixes are often lost when the repair material is retempered. Retempering of bagged mixes will not be permitted.
- Application.
Hot and cold weather application.
- The temperature of the repair material and the concrete substrate at the time of application must be between 40°F and 95°F. Contractor must also adhere to manufacturer limits if they are more stringent.
- Do not apply repair material when the ambient temperature in the shade is below 40°F and falling. Repair material may be placed when the ambient temperature in the shade is 35°F and rising or above 40°F.
- Shade the repair material components and the repair substrate if the ambient temperature is above 100°F.
In almost all cases, the repair material should be applied over a
Saturated Surface Dry (SSD) substrate. ACI CT-13, ACI concrete Terminology, defines saturated surface-dry (SSD) as condition of an aggregate particle or other porous solid when the permeable pores are filled with water and no water is on the exposed surfaces. In other words, SSD is achieved when the surface of concrete substrate is saturated with water to a depth of about 1/8 to 1/4 inches, but the exposed surface is devoid of free water, as if it had been dried with a towel
.Surfaces that will be repaired with a cementitious repair material should be in a saturated surface dry (SSD) condition immediately prior to material application. This condition is achieved by soaking the surfaces with water for 2 to 24 hours or pressure water jetting for at least 15 minutes just before repair material application. Concrete can be visualized like a sponge; when the substrate concrete material can no longer take on water like a sponge that is full, SSD condition has been achieved. Immediately before material application, the repair surfaces should be allowed to start drying. The surface should appear slightly damp, with no standing water.
Obtain an SSD condition using the following method:
- Several minutes beforerepairing, apply pressure water blast to the surface for a brief period (at least 15minutes depending on the porosity of the concrete). An SSD condition is achieved if the surface remains damp until therepairmaterial is applied.
Surface may be damp, but must be free of standing water.
Do not use a proprietary epoxy bonding layer in lieu of an SSD substrate unless approved by the Engineer. If use of a proprietary bonding agent is authorized, mix it in accordance with the manufacturer’s requirements. Use only TxDOT approved Type V or Type VII material (refer to
–
Epoxies and Adhesives
).If trowel-applying the repair material:
- Apply over a bonding layer, which typically consists of a scrub coat brushed into the SSD substrate.
- The scrub coat consists of a thin layer of repair mortar that is pushed into the surface using a stiff brush, completely covering the substrate and filling all voids. Ensure that there is not an excess amount of water on the brush used to apply the scrub coat.
- Do not dilute the scrub coat material with additional liquid.
- Apply the repair material while the bonding layer is still wet (scrub coat) or tacky (proprietary bonding layer).
- Apply in minimum 1/2-inch and maximum 1 1/2–inch lifts unless otherwise approved by the Engineer.
- For multiple lift applications, roughen the surface of the preceding lift before it has reached initial set.
- Wait until the preceding lift has reached initial set (refer to the product data sheet for estimated time frame) to prevent sagging prior to applying the next lift.
- Wet the surface just prior to applying the subsequent lift.
If
repairing
, using a form-and-pour method:
- Prepare and install the forms prior to mixing the repair material.
- Ensure that forms are tight enough to prevent grout leakage.
- Place the repair material in the forms while the bonding layer is still wet (scrub coat) or tacky (epoxy).
- Consolidate the materialadequately. Refer to the product data sheet for consolidation instructions.Do not over-vibrate the mix. Do not vibrate self-consolidating concrete products.
If required by the Engineer, determine the compressive strength of the
repair
material by making concrete test cylinders.
- Curing.Failures often occur in cement-based repair materials due to inadequate curing.
- Large plastic shrinkage cracks can develop if rapid moisture loss occurs before therepairhas the capacity to resist tensile loads that develop as a result of the shrinkage.
- Drying shrinkage can lead to elevated stress levels that cause cracking within the repair material or at the bond line between therepairand the parent concrete.
- It is paramount to the long-term success of the repair that proper moist curing commence as soon as possible after application of the repair material, and that it continue for a sufficient amount of time thereafter.
After placing repair material, moist cure exposed
repair
material surfaces for a minimum of 72 hours using wet mats, water spray, or ponding. Do not use a curing compound in lieu of moist curing unless approved by the Engineer. Curing compound will only be considered for use when water curing will be unnecessarily burdensome and when allowed by manufacturer literature. If use of a curing compound is authorized, any remaining residue must be completely removed after the required curing period.In form-and-pour applications, leave forms in place for a minimum of 72 hours after placing the repair material. Place wet mats on exposed sections and over the openings used to place the material.
The Engineer may reduce required curing time in some cases, such as when there is a need to return the member to service quickly or when CFRP will be placed over the
repair
material.Do not allow concrete surfaces to become dry during the specified moist curing period. Ensure that wet mats are kept wet during the entire cycle.
Insulate the
repair
material to ensure that there is adequate heat for curing if ambient temperature is expected to fall below 50°F. If using artificial heating methods, do not heat the air around the repair material to above 130°F.After curing, the repair area will be inspected visually for cracking and sounded by the inspector with firm hammer blows to ensure the repair has adequate bond without cracking and is free of soft or other unsound material. Acceptance of the repair will be based on the findings of this inspection.
- Finish.Ensure that therepairsclosely resemble the surrounding concrete. Finishrepairwork as outlined in Item 427, Section 4.3.4 for Off-the-Form Finish.
- Blend in the repair area if after completing the work therepairmaterial does not closely resemble the surrounding concrete.Perform blending or slurry coat finish after measurement of repair location has been completed.The Contractor may use a slurry coat finish in accordance with Item 427 to blend in therepair. The Engineer will review other methods proposed for blendingrepairs.
- Repairsshould not be easily discernible if viewed from more than 25 feet away.
- Measurement will be make prior to blending repair edges with parent material.